DjangoにTailwindを導入して綺麗なページを作ろう!

本章では、DjangoフレームワークにTailwindCSSを導入し、魅力的なウェブページを作成する手順を説明します。TailwindCSSは、デザインを迅速かつ効率的に構築できるユーティリティファーストのCSSフレームワークです。Djangoの強力なバックエンドとTailwindCSSのスタイリング機能を組み合わせることで、見栄えの良いアプリケーションを簡単に実現できます。
目次
チュートリアルの全体像
第4章: Tailwindを使って綺麗なページを作る (now🐾)
導入手順
Django-Tailwindをインストール
まず、Django-Tailwindをプロジェクトに追加します。これにより、TailwindCSSの機能をDjangoプロジェクト内で利用できるようになります。具体的には、requirements.txtファイルに次の行を追加します。
Django
mysqlclient
django-tailwind[reload]
この行を追加することで、必要なパッケージがインストールされます。次にコンテナを再ビルド&再起動します。コマンドは以下の通りです。
docker compose up -d --buildこのコマンドを実行すると、環境が最新の状態に更新されます。
Django-Tailwindをプロジェクトに登録
次に、settings.pyファイルを開き、INSTALLED_APPSにtailwindを追加します。これにより、TailwindCSSがDjangoアプリケーションで認識されます。
settings.py
INSTALLED_APPS = [
  # ......
  'tailwind'
]
テーマアプリを作成
次に、TailwindCSSのテーマを作成します。以下のコマンドを実行してください。
python manage.py tailwind initこれにより、テーマアプリが作成されます。
テーマアプリを登録
settings.pyのINSTALLED_APPSにthemeを追加します。
作成したテーマアプリを、settings.pyのINSTALLED_APPSに追加します。以下のように記述してください。
INSTALLED_APPS = [
  # ......
  'tailwind',
  'django_browser_reload',
  'theme'
]
さらに、以下の設定も追加します。
TAILWIND_APP_NAME = 'theme'Internal IPを登録
ブラウザのリロード機能を利用するために、settings.pyに以下のように記述して、Internal IPを登録します。
INTERNAL_IPS = [
    "127.0.0.1:8000",
]
Tailwindの依存インストール
次に、以下のコマンドを実行してTailwindCSSの依存関係をインストールします。
python manage.py tailwind installブラウザリロード機能の追加
リアルタイムでのブラウザリロード機能を追加します。settings.pyのINSTALLED_APPSにdjango_browser_reloadを追加し、MIDDLEWAREに以下の行を加えます。
settings.py
INSTALLED_APPS = [
  # ...
  'tailwind',
  'theme',
  'django_browser_reload'
]
MIDDLEWARE = [
# ...
"django_browser_reload.middleware.BrowserReloadMiddleware"
]さらに、urls.pyに次の行を追加して、リロード機能のURLを設定します。
urls.py
urlpatterns = [
    # ...
    path("__reload__/", include("django_browser_reload.urls")),
]
開発サーバ起動
開発サーバを起動して、TailwindCSSが正しく機能しているか確認します。以下のコマンドを実行してください。
python manage.py tailwind startページをデザイン
静的ファイルの配置
静的ファイルを配置するため、プロジェクト内にstaticディレクトリを作成し、assetsディレクトリの内容をコピーします。また、settings.pyに次の設定を追加します。
STATICFILES_DIRS = [os.path.join(BASE_DIR, "static")]これにより、静的ファイルが正しく認識されるようになります。
テーマ作成
こから、実際にページをデザインしていきます。まずは、テーマのHTMLファイルを作成します。theme/templates/guest.htmlに基本的な構造を追加し、TailwindCSSのクラスを利用してスタイルを適用します。次のように記述します。
theme/templates/guest.html
{% load static tailwind_tags %}
<!DOCTYPE html>
<html lang="ja">
  <head>
    <title>Inustagram</title>
    <meta charset="UTF-8" />
    <meta name="viewport" content="width=device-width, initial-scale=1.0" />
    <meta http-equiv="X-UA-Compatible" content="ie=edge" />
    {% tailwind_css %}
  </head>
  <body>
    <div class="min-h-screen bg-gray-100">
      <nav class="bg-white border-b border-gray-100">
        <div class="max-w-7xl mx-auto px-4 sm:px-6 lg:px-8">
          <div class="flex justify-between h-16 items-center">
            <div class="flex">
              <div class="shrink-0 flex items-center">
                {% load static %}
                <img src="{% static '/logo.png' %}" class="h-6 fill-current text-gray-500" />
              </div>
            </div>
            <div class="space-x-8">
              <a href="{% url 'login' %}" class="inline-flex items-center px-1 pt-1 border-indigo-400 text-sm font-medium leading-5 text-gray-900 focus:outline-none focus:border-indigo-700 transition duration-150 ease-in-out">ログイン</a>
              <a href="{% url 'signup' %}" class="inline-flex items-center px-1 pt-1 border-indigo-400 text-sm font-medium leading-5 text-gray-900 focus:outline-none focus:border-indigo-700 transition duration-150 ease-in-out">会員登録</a>
            </div>
          </div>
        </div>
      </nav>
      <main>
        {% block main %}

        {% endblock %}
      </main>
    </div>
  </body>
</html>
このようにして、TailwindCSSを使ったスタイリングを行い、必要なページのデザインを進めていきます。
theme/templates/base.html
{% load static tailwind_tags %}
<!DOCTYPE html>
<html lang="ja">
  <head>
    <title>Inustagram</title>
    <meta charset="UTF-8" />
    <meta name="viewport" content="width=device-width, initial-scale=1.0" />
    <meta http-equiv="X-UA-Compatible" content="ie=edge" />
    {% tailwind_css %}
  </head>

  <body>
    <div class="min-h-screen bg-gray-100">
      {% include 'navigation.html' %}
      <header class="bg-white shadow">
        <div class="max-w-7xl mx-auto py-6 px-4 sm:px-6 lg:px-8">
          <h2 class="font-semibold text-xl text-gray-800 leading-tight">
            {% block title %}
            {% endblock %}
          </h2>
        </div>
      </header>
      <main>
        {% block main %}

        {% endblock %}
      </main>
    </div>
  </body>
</html>
theme/templates/base.htmlやtheme/templates/navigation.htmlを作成し、共通部分を整理します。これにより、保守性が向上し、ページ全体のデザインが統一されます。
theme/templates/navigation.html
<nav class="bg-white border-b border-gray-100">
  <div class="max-w-7xl mx-auto px-4 sm:px-6 lg:px-8">
    <div class="flex justify-between h-16">
      <div class="flex">
        <div class="shrink-0 flex items-center">
          <a href="/dashboard">
            {% load static %}
            <img src="{% static '/logo.png' %}" class="h-6 fill-current text-gray-500" />
          </a>
        </div>

        <div class="hidden space-x-8 sm:-my-px sm:ms-10 sm:flex">
          <a href="/dashboard" class="inline-flex items-center px-1 pt-1 border-indigo-400 text-sm font-medium leading-5 text-gray-900 focus:outline-none focus:border-indigo-700 transition duration-150 ease-in-out">ダッシュボード</a>
          <a href="/posts/create" class="inline-flex items-center px-1 pt-1 border-indigo-400 text-sm font-medium leading-5 text-gray-900 focus:outline-none focus:border-indigo-700 transition duration-150 ease-in-out">新規作成</a>
          <a href="/posts" class="inline-flex items-center px-1 pt-1 border-indigo-400 text-sm font-medium leading-5 text-gray-900 focus:outline-none focus:border-indigo-700 transition duration-150 ease-in-out">新着投稿</a>
          <a href="/users" class="inline-flex items-center px-1 pt-1 border-indigo-400 text-sm font-medium leading-5 text-gray-900 focus:outline-none focus:border-indigo-700 transition duration-150 ease-in-out">オーナー</a>
        </div>
      </div>
      <div class="inline-block sm:items-center sm:ms-6 relative">
        <button id="menu-button" class="inline-flex items-center px-3 my-6 border border-transparent text-sm leading-4 font-medium rounded-md text-gray-500 bg-white hover:text-gray-700 focus:outline-none transition ease-in-out duration-150">
          <img class="block size-6 rounded-full aspect-square object-cover mr-2" src="/static/dogs/dog_1.jpg" />
          <div>{{ request.user.username }}</div>

          <div class="ms-1">
            <svg class="fill-current h-4 w-4" xmlns="http://www.w3.org/2000/svg" viewBox="0 0 20 20">
              <path fill-rule="evenodd" d="M5.293 7.293a1 1 0 011.414 0L10 10.586l3.293-3.293a1 1 0 111.414 1.414l-4 4a1 1 0 01-1.414 0l-4-4a1 1 0 010-1.414z" clip-rule="evenodd" />
            </svg>
          </div>
        </button>
        <div id="menu" class="hidden absolute right-0 z-10 mt-2 w-56 origin-top-right divide-y divide-gray-100 rounded-md bg-white shadow-lg ring-1 ring-black ring-opacity-5 focus:outline-none" role="menu" aria-orientation="vertical" aria-labelledby="menu-button" tabindex="-1">
          <div class="py-1">
            <a href="/accounts/profile" class="block px-4 py-2 text-sm text-gray-700">プロフィール</a>
          </div>
          <div class="py-1">
            <form method="POST" action="{% url 'logout' %}">
              {% csrf_token %}
              <button type="submit" class="block px-4 py-2 text-sm text-gray-700">ログアウト</button>
            </form>
          </div>
        </div>
      </div>
    </div>
  </div>
</nav>
<script>
  document.addEventListener('DOMContentLoaded', () => {
    const button = document.querySelector('#menu-button')
    const menu = document.querySelector('#menu')
    document.addEventListener('click', (e) => {
      if (!e.target.closest('#menu-button')) {
        menu.classList.add('hidden')
      } else {
        if (menu.classList.contains('hidden')) {
          menu.classList.remove('hidden')
        } else {
          menu.classList.add('hidden')
        }
      }
    })
  })
</script>
レイアウト
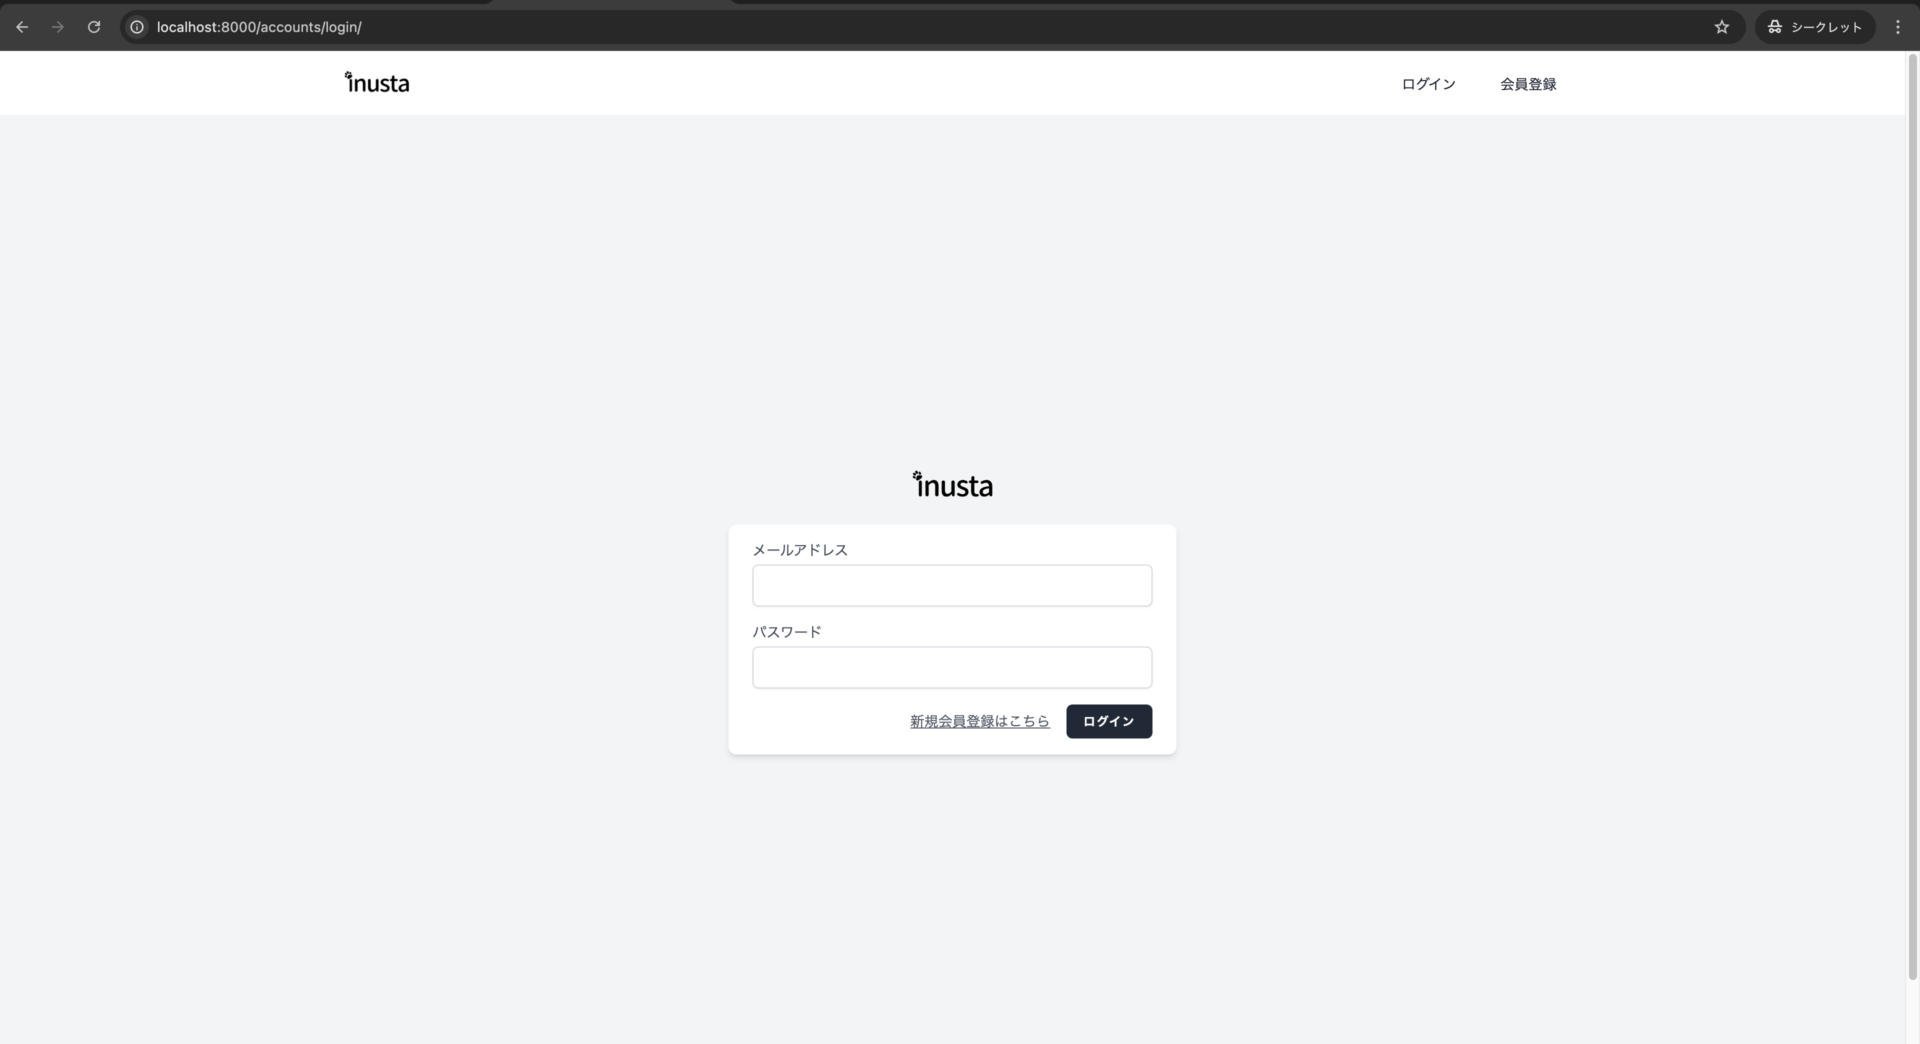
ユーザーのログインやサインアップのためのページを、accounts/templates/accounts/login.htmlやaccounts/templates/accounts/signup.htmlに作成します。TailwindCSSのクラスを用いて、使いやすく魅力的なUIを実現しましょう。
accounts/templates/accounts/login.html
{% extends 'guest.html' %}
{% block main %}
  <div class="min-h-screen flex flex-col sm:justify-center items-center pt-6 sm:pt-0 bg-gray-100">
    <div>
      {% load static %}
      <img src="{% static '/logo.png' %}" class="w-20 fill-current text-gray-500" />
    </div>
    <div class="w-full sm:max-w-md mt-6 px-6 py-4 bg-white shadow-md overflow-hidden sm:rounded-lg">
      {% if form.errors %}
        <p class="text-red-500 text-sm">ログイン名とパスワードが一致しません。</p>
      {% endif %}
      <form method="post" action="{% url 'login' %}">
        {% csrf_token %}
        <div>
          <label class="block font-medium text-sm text-gray-700">メールアドレス</label>
          <input name="username" class="block mt-1 w-full border-gray-300 focus:border-indigo-500 focus:ring-indigo-500 rounded-md shadow-sm" />
        </div>
        <div class="mt-4">
          <label class="block font-medium text-sm text-gray-700">パスワード</label>
          <input type="password" name="password" class="block mt-1 w-full border-gray-300 focus:border-indigo-500 focus:ring-indigo-500 rounded-md shadow-sm" />
        </div>
        <div class="flex items-center justify-end mt-4">
          <a class="underline text-sm text-gray-600 hover:text-gray-900 rounded-md focus:outline-none focus:ring-2 focus:ring-offset-2 focus:ring-indigo-500" href="{% url 'signup' %}">新規会員登録はこちら</a>

          <button class="ml-4 inline-flex items-center px-4 py-2 bg-gray-800 border border-transparent rounded-md font-semibold text-xs text-white uppercase tracking-widest hover:bg-gray-700 focus:bg-gray-700 active:bg-gray-900 focus:outline-none focus:ring-2 focus:ring-indigo-500 focus:ring-offset-2 transition ease-in-out duration-150">ログイン</button>
        </div>
      </form>
    </div>
  </div>
{% endblock %}
accounts/templates/accounts/signup.html
{% extends 'guest.html' %}
{% block main %}
  <div class="min-h-screen flex flex-col sm:justify-center items-center pt-6 sm:pt-0 bg-gray-100">
    <div>
      {% load static %}
      <img src="{% static '/logo.png' %}" class="w-20 fill-current text-gray-500" />
    </div>
    <div class="w-full sm:max-w-md mt-6 px-6 py-4 bg-white shadow-md overflow-hidden sm:rounded-lg">
      {% if form.errors %}
        {{ form.errors }}
      {% endif %}
      <form method="post" action="{% url 'signup' %}">
        {% csrf_token %}
        <div>
          <label class="block font-medium text-sm text-gray-700">ユーザ名</label>
          <input name="username" class="block mt-1 w-full border-gray-300 focus:border-indigo-500 focus:ring-indigo-500 rounded-md shadow-sm" />
        </div>
        <div class="mt-4">
          <label class="block font-medium text-sm text-gray-700">メールアドレス</label>
          <input name="email" class="block mt-1 w-full border-gray-300 focus:border-indigo-500 focus:ring-indigo-500 rounded-md shadow-sm" />
        </div>
        <div class="mt-4">
          <label class="block font-medium text-sm text-gray-700">パスワード</label>
          <input type="password" name="password1" class="block mt-1 w-full border-gray-300 focus:border-indigo-500 focus:ring-indigo-500 rounded-md shadow-sm" />
        </div>
        <div class="mt-4">
          <label class="block font-medium text-sm text-gray-700">パスワード(確認用)</label>
          <input type="password" name="password2" class="block mt-1 w-full border-gray-300 focus:border-indigo-500 focus:ring-indigo-500 rounded-md shadow-sm" />
        </div>
        <div class="flex items-center justify-end mt-4">
          <a class="underline text-sm text-gray-600 hover:text-gray-900 rounded-md focus:outline-none focus:ring-2 focus:ring-offset-2 focus:ring-indigo-500" href="{% url 'signup' %}">すでにアカウントをお持ちの方はこちら</a>
          <button type="submit" class="ml-4 inline-flex items-center px-4 py-2 bg-gray-800 border border-transparent rounded-md font-semibold text-xs text-white uppercase tracking-widest hover:bg-gray-700 focus:bg-gray-700 active:bg-gray-900 focus:outline-none focus:ring-2 focus:ring-indigo-500 focus:ring-offset-2 transition ease-in-out duration-150">登録</button>
        </div>
      </form>
    </div>
  </div>
{% endblock %}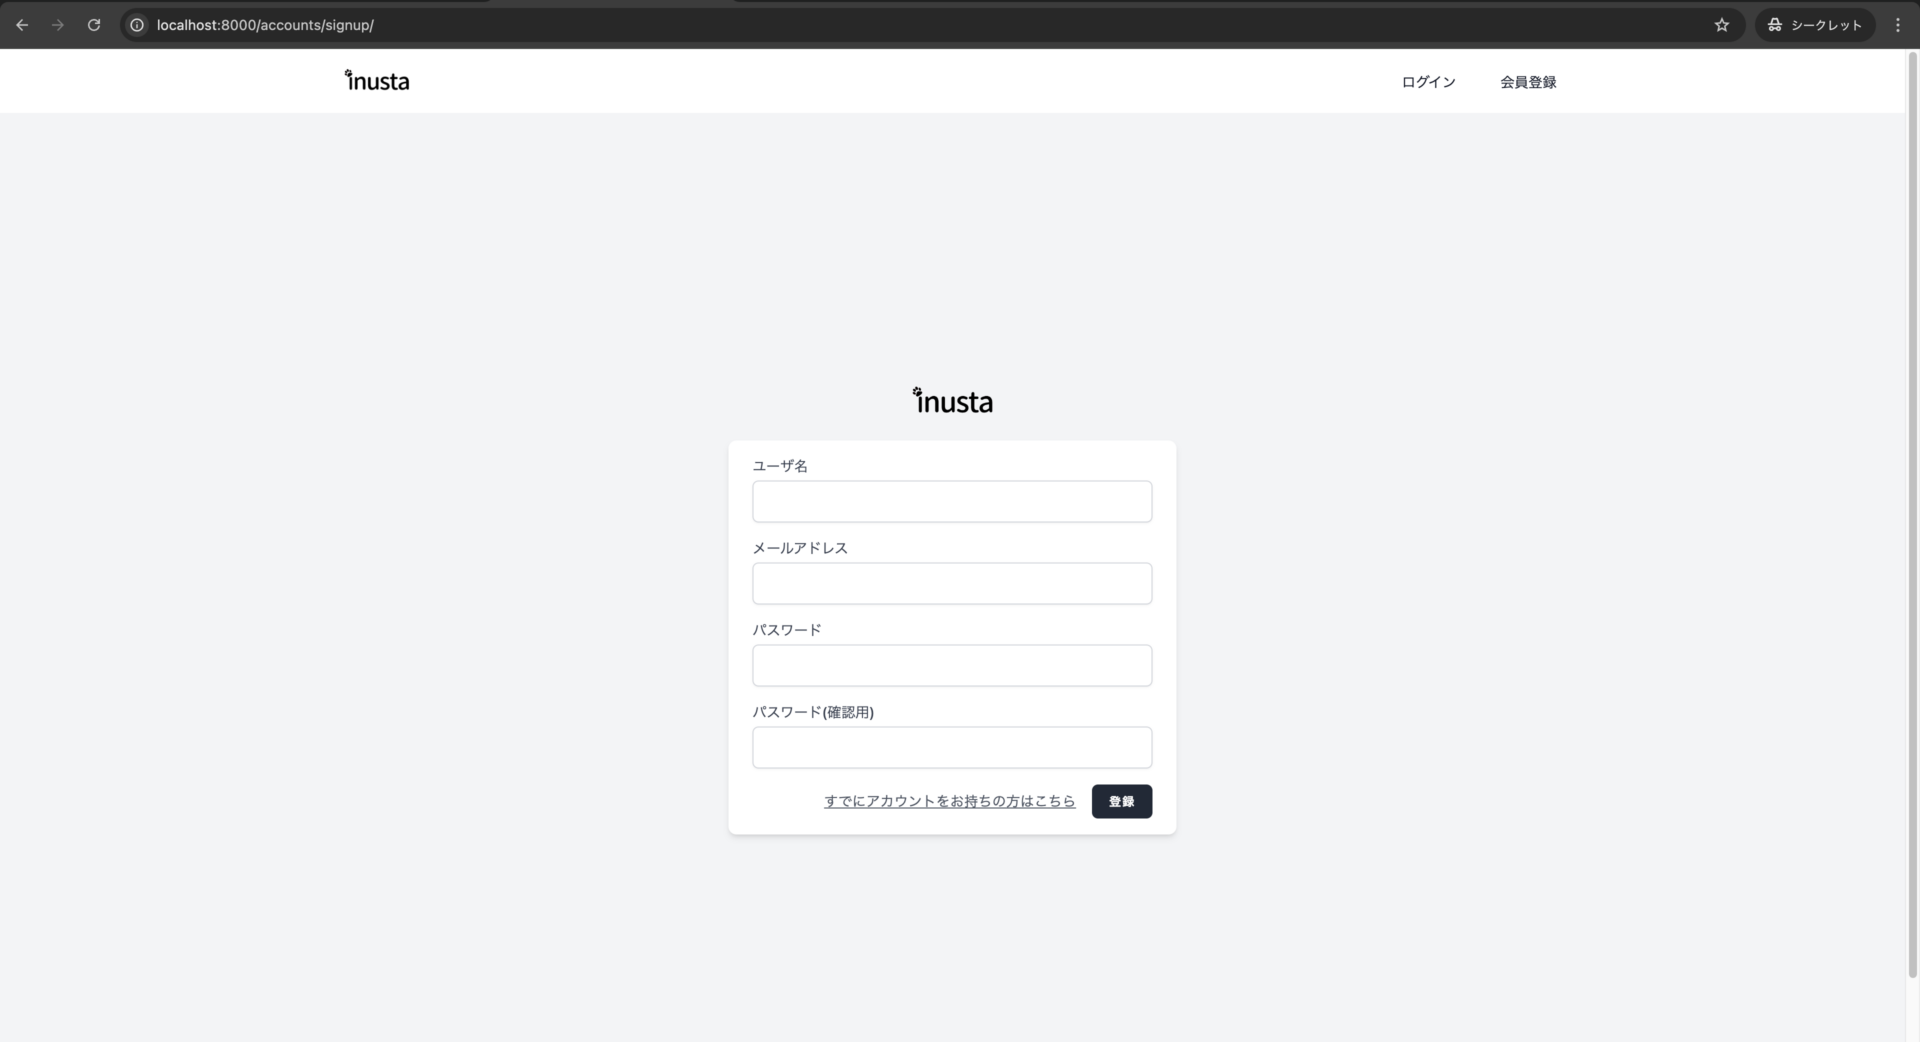
ユーザーが自分のプロフィールを編集できる画面も作成します。accounts/templates/accounts/profile.htmlに、必要な情報を入力できるフォームを設置します。
accounts/templates/accounts/profile.html
{% extends 'base.html' %}
{% block title %}
  プロフィール編集
{% endblock %}
{% block main %}
  <div class="max-w-5xl mx-auto">
    <div class="p-4 mt-8 bg-white">
      <div class="max-w-xl">
        <section>
          <header>
            <h2 class="text-lg font-medium text-gray-900">アカウント情報</h2>

            <p class="mt-1 text-sm text-gray-600">アカウント情報やメールアドレスの更新</p>
          </header>

          <form method="post" action="{% url 'profile' %}" class="mt-6 space-y-6" enctype="multipart/form-data">
            {% csrf_token %}
            <div>
              <label class="block font-medium text-sm text-gray-700" for="name">名前</label>
              <input value="{{ request.user.username }}" class="border-gray-300 focus:border-indigo-500 focus:ring-indigo-500 rounded-md shadow-sm mt-1 block w-full" name="username" type="text" required="required" />
            </div>

            <div>
              <label class="block font-medium text-sm text-gray-700" for="email">メールアドレス</label>
              <input value="{{ request.user.email }}" class="border-gray-300 focus:border-indigo-500 focus:ring-indigo-500 rounded-md shadow-sm mt-1 block w-full" name="email" type="email" />
            </div>

            <div>
              <label class="block font-medium text-sm text-gray-700" for="description">自己紹介</label>
              <textarea class="p-2.5 w-full rounded border border-gray-300 focus:ring-blue-500 focus:border-blue-500 mt-1" name="description" rows="6">{{ request.user.description }}</textarea>
            </div>

            <div>
              <label class="block font-medium text-sm text-gray-700" for="icon">アイコン</label>
              <input type="file" class="w-full text-gray-500 font-medium bg-gray-100 file:border-0 file:py-2.5 file:px-4 file:mr-4 file:bg-gray-800 file:text-white rounded mt-1" name="icon" />
            </div>

            <div class="flex items-center gap-4">
              <button type="submit" class="inline-flex items-center px-4 py-2 bg-gray-800 border border-transparent rounded-md font-semibold text-xs text-white uppercase tracking-widest hover:bg-gray-700 focus:bg-gray-700 active:bg-gray-900 focus:outline-none focus:ring-2 focus:ring-indigo-500 focus:ring-offset-2 transition ease-in-out duration-150">保存</button>
            </div>
          </form>
        </section>
      </div>
    </div>
  </div>
{% endblock %}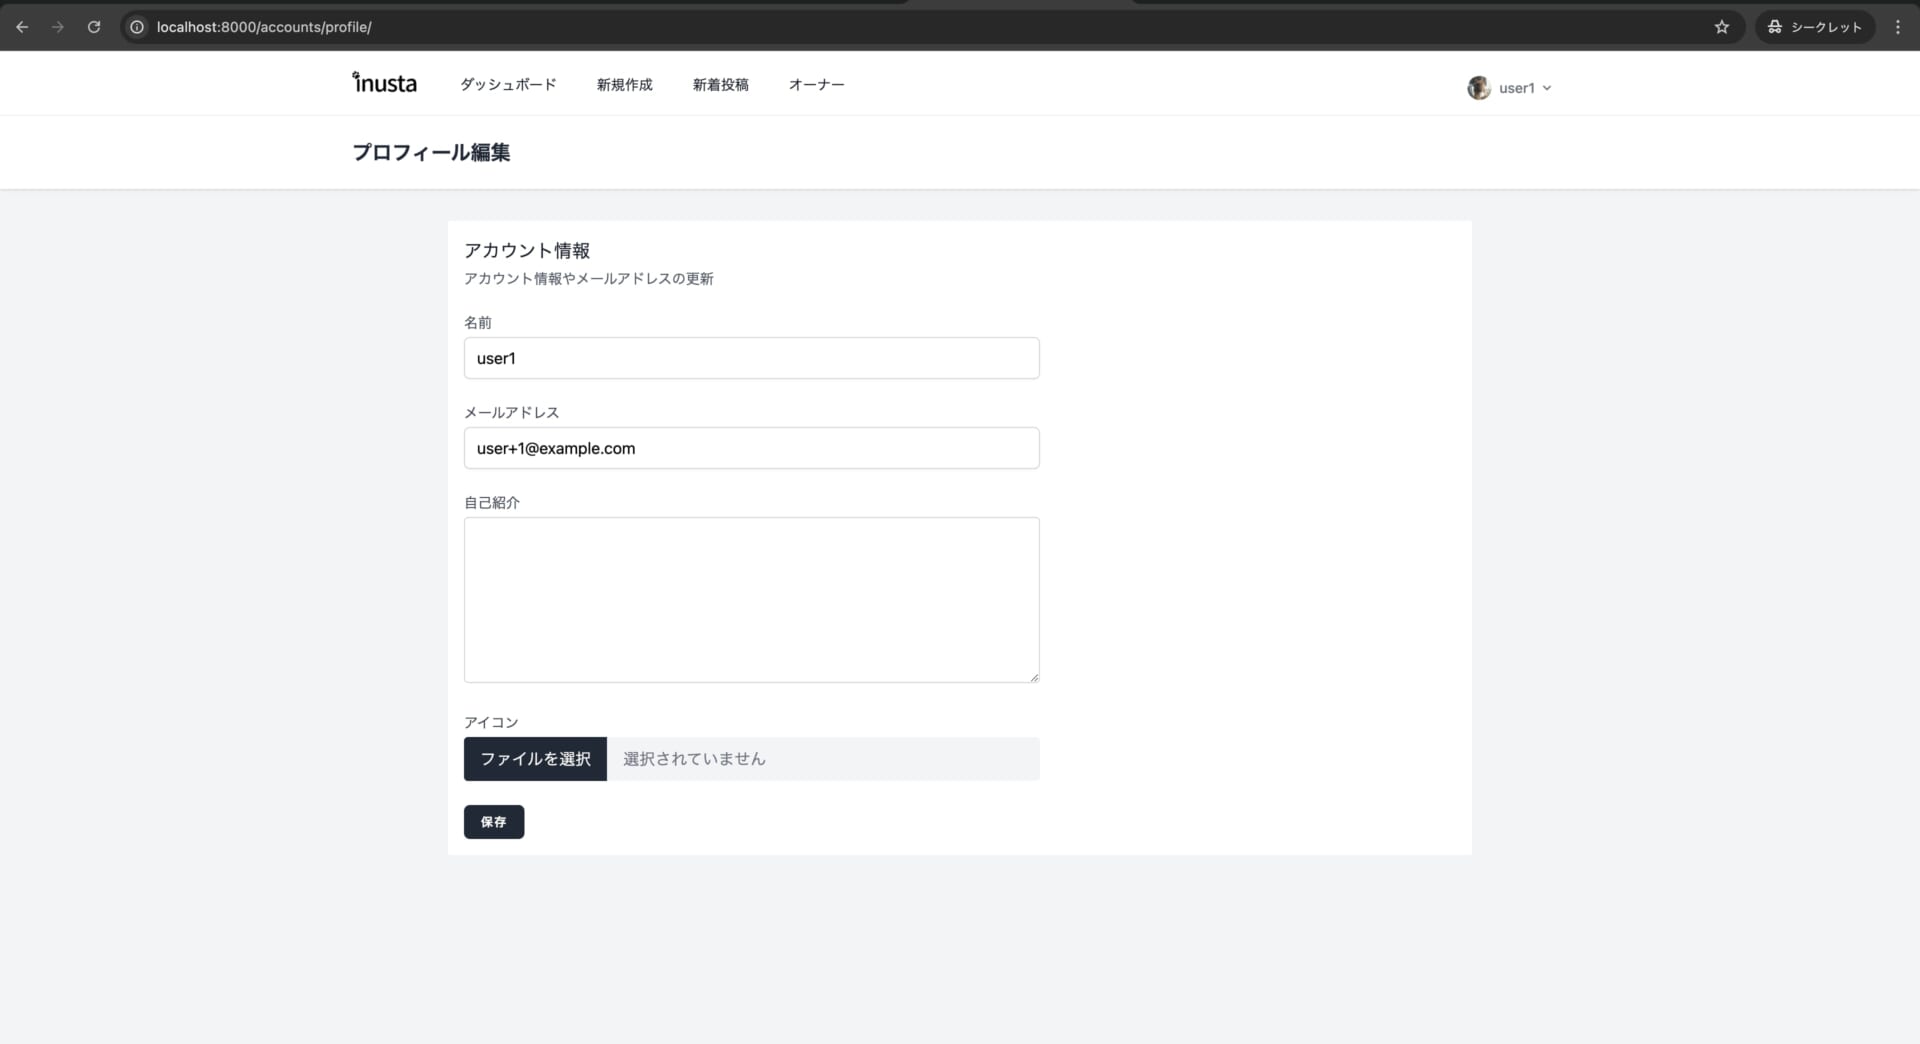
※自己紹介、アイコンは後で実装します。
まとめ
これで、DjangoにTailwindCSSを導入し、基本的なページを作成する手順を詳しく解説しました。今回学習した知識を使えば、魅力的なユーザーインターフェースを持つアプリケーションが構築できるようになります!





この記事へのコメントはありません。