【Selenium講座】第7章: 収集したデータの保存
スクレイピングや自動化で収集したデータを適切に保存することで、後での分析や利用が容易になります。データを失わないためにも、保存方法を考えることが重要です。
目次
講座の全体像
CSVファイルへの保存
シンプルで扱いやすく、多くのツールやプログラミング言語でサポートされています。
CSVファイルで保存するメリット・デメリットは以下のようになります。
メリット
- シンプルさ: CSVはテキスト形式で、非常に簡単に作成・編集できる。
- 可読性: Excelや他のスプレッドシートソフトウェアで容易に閲覧可能。
- 軽量: データが少ない場合、ファイルサイズが小さい。
デメリット
- フォーマットの制約: 複雑なデータ構造(ネストしたデータなど)には対応できない。
- データ型の限定: 全てのデータは文字列として保存されるため、数値や日付などの型情報が失われる。
実装例
import csv  # CSVモジュールのインポート
import time

from selenium import webdriver
from selenium.webdriver.chrome.options import Options
from selenium.webdriver.common.by import By

options = Options()
driver = webdriver.Chrome(options=options)

driver.get("https://inusta-next.vercel.app/login")
time.sleep(3)

email_input = driver.find_element(By.NAME, "email")
password_input = driver.find_element(By.NAME, "password")

email_input.send_keys("user+1@example.com")
password_input.send_keys("password")

button = driver.find_elements(By.TAG_NAME, "button")[0]
button.click()

time.sleep(10)

posts_link = driver.find_element(By.LINK_TEXT, "新着投稿")
posts_link.click()

time.sleep(10)

posts = driver.find_elements(By.CLASS_NAME, "posts")

csv_filename = "posts.csv"
header = ["画像のURL", "ユーザ名", "投稿作成日時"]

# CSVファイルに書き込み
with open(csv_filename, mode="w", newline="", encoding="utf-8") as file:
    writer = csv.writer(file)
    writer.writerow(header)  # ヘッダーを書き込み

    # 各投稿データを取得してCSVに保存
    for post in posts:
        img = post.find_element(By.TAG_NAME, "img")  # 画像URL
        username = post.find_element(By.CLASS_NAME, "username")  # ユーザー名
        created_at = post.find_element(By.CLASS_NAME, "created-at")  # 投稿作成日

        # データをコンソールに表示
        print("画像のURL:", img.get_attribute("src"))
        print("ユーザ名:", username.text)
        print("投稿作成日時:", created_at.text)

        # CSVファイルにデータを書き込む
        writer.writerow([img.get_attribute("src"), username.text, created_at.text])

driver.quit()
データベースへの保存
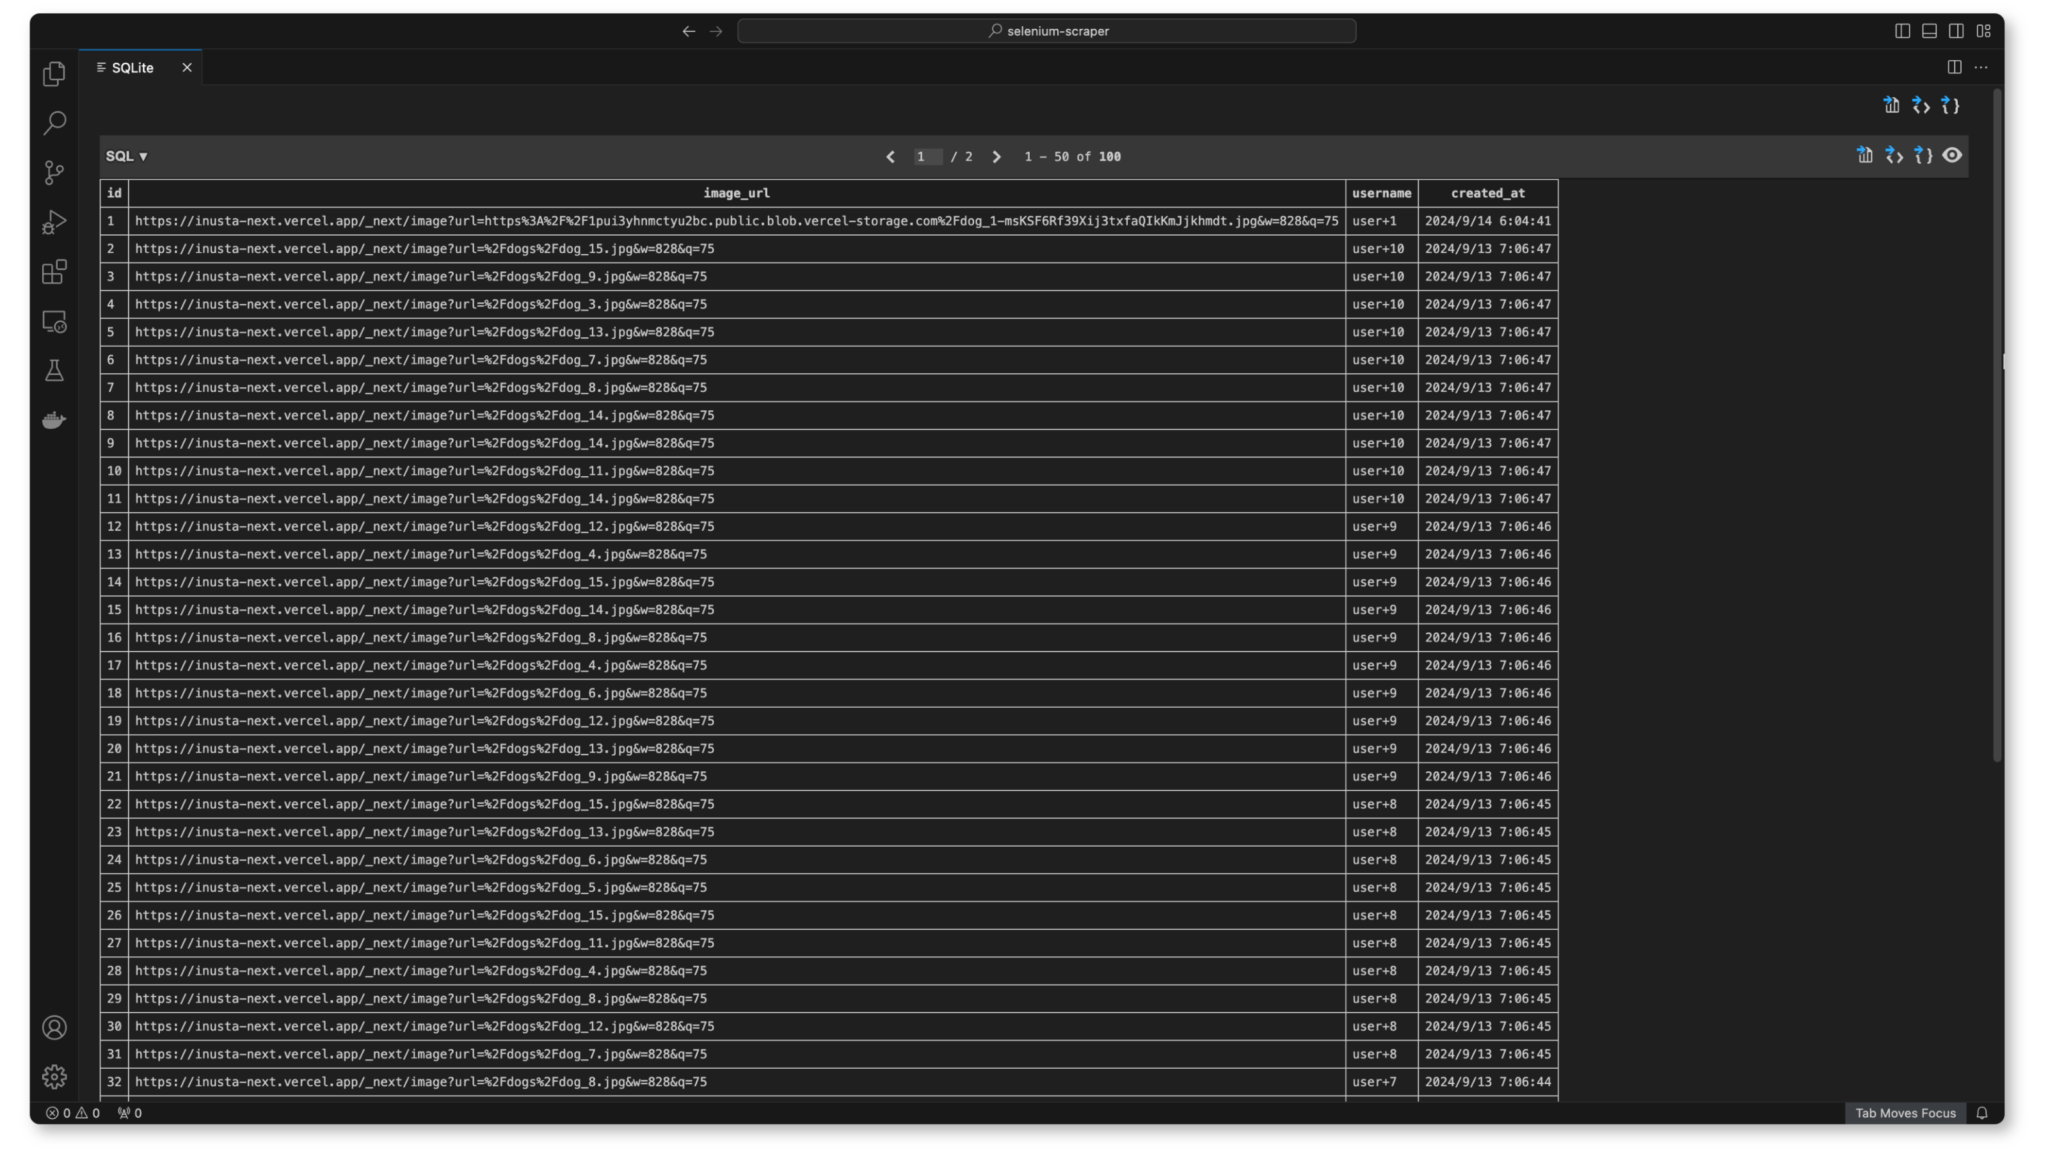
大量のデータを効率的に保存・管理でき、複雑なクエリを実行できます。
データベースで保存するメリット・デメリットは以下のようになります。
メリット
- 大規模データの管理: 大量のデータを効率的に保存・検索できる。
- データ整合性: トランザクションやリレーションシップの管理が可能。
- 複雑なクエリ: SQLを使ってデータを容易にフィルタリング・集計できる。
デメリット
- セットアップが必要: データベースのインストールや設定が必要。
- 運用コスト: サーバー運用やバックアップが必要な場合、管理コストがかかる。
実装例
import sqlite3  # SQLiteモジュールのインポート
import time

from selenium import webdriver
from selenium.webdriver.chrome.options import Options
from selenium.webdriver.common.by import By

# SQLiteデータベースに接続 (ファイル名を指定)
db_filename = "posts.db"
conn = sqlite3.connect(db_filename)
cursor = conn.cursor()

# テーブル作成(もしまだ存在しない場合)
cursor.execute(
    """
    CREATE TABLE IF NOT EXISTS posts (
        id INTEGER PRIMARY KEY AUTOINCREMENT,
        image_url TEXT,
        username TEXT,
        created_at TEXT
    )
"""
)

driver = webdriver.Chrome()

driver.get("https://inusta-next.vercel.app/login")
time.sleep(3)

email_input = driver.find_element(By.NAME, "email")
password_input = driver.find_element(By.NAME, "password")

email_input.send_keys("user+1@example.com")
password_input.send_keys("password")

button = driver.find_elements(By.TAG_NAME, "button")[0]
button.click()

time.sleep(10)

posts_link = driver.find_element(By.LINK_TEXT, "新着投稿")
posts_link.click()

time.sleep(10)

posts = driver.find_elements(By.CLASS_NAME, "posts")

# 各投稿データを取得してデータベースに保存
for post in posts:
    img = post.find_element(By.TAG_NAME, "img")  # 画像URL
    username = post.find_element(By.CLASS_NAME, "username")  # ユーザー名
    created_at = post.find_element(By.CLASS_NAME, "created-at")  # 投稿作成日

    # データをコンソールに表示
    print("画像のURL:", img.get_attribute("src"))
    print("ユーザ名:", username.text)
    print("投稿作成日時:", created_at.text)

    # SQLiteデータベースにデータを挿入
    cursor.execute(
        """
        INSERT INTO posts (image_url, username, created_at)
        VALUES (?, ?, ?)
    """,
        (img.get_attribute("src"), username.text, created_at.text),
    )

# データベースに変更を保存して接続を閉じる
conn.commit()
conn.close()

# ドライバーを閉じる
driver.quit()
JSON形式での保存
階層的なデータを簡単に保存でき、ウェブアプリケーションとの互換性があります。
メリット
- 柔軟な構造: ネストしたデータ構造を持つことができ、複雑なデータを表現しやすい。
- Webとの親和性: JSONはAPI通信などで広く使用されており、他のシステムとの連携が容易。
デメリット
- データ型の限定: JSONも基本的には文字列、数値、配列、オブジェクトの型しか扱えない。
- 大規模データには不向き: 大量のデータを扱う場合、パフォーマンスに影響が出ることがある。
実装例
import json
import time

from selenium import webdriver
from selenium.webdriver.chrome.options import Options
from selenium.webdriver.common.by import By

driver = webdriver.Chrome()

driver.get("https://inusta-next.vercel.app/login")
time.sleep(3)

email_input = driver.find_element(By.NAME, "email")
password_input = driver.find_element(By.NAME, "password")

email_input.send_keys("user+1@example.com")
password_input.send_keys("password")

button = driver.find_elements(By.TAG_NAME, "button")[0]
button.click()

time.sleep(10)

posts_link = driver.find_element(By.LINK_TEXT, "新着投稿")
posts_link.click()

time.sleep(10)

posts = driver.find_elements(By.CLASS_NAME, "posts")

data = []

for post in posts:
    img = post.find_element(By.TAG_NAME, "img")
    username = post.find_element(By.CLASS_NAME, "username")
    created_at = post.find_element(By.CLASS_NAME, "created-at")

    post_data = {
        "image_url": img.get_attribute("src"),
        "username": username.text,
        "created_at": created_at.text,
    }
    data.append(post_data)

with open("posts.json", "w", encoding="utf-8") as json_file:
    json.dump(data, json_file, ensure_ascii=False, indent=4)

driver.quit()
画像の保存
まず、必要なライブラリをインストールします。
pip install requests pillow実装例
import time
from io import BytesIO

import requests
from PIL import Image
from selenium import webdriver
from selenium.webdriver.common.by import By

driver = webdriver.Chrome()

driver.get("https://inusta-next.vercel.app/login")
time.sleep(3)

email_input = driver.find_element(By.NAME, "email")
password_input = driver.find_element(By.NAME, "password")

email_input.send_keys("user+1@example.com")
password_input.send_keys("password")

button = driver.find_elements(By.TAG_NAME, "button")[0]
button.click()

time.sleep(10)

posts_link = driver.find_element(By.LINK_TEXT, "新着投稿")
posts_link.click()

time.sleep(10)

posts = driver.find_elements(By.CLASS_NAME, "posts")

for index, post in enumerate(posts):
    img = post.find_element(By.TAG_NAME, "img")
    img_url = img.get_attribute("src")

    response = requests.get(img_url)
    image = Image.open(BytesIO(response.content))

    image.save(f"posts/post_image_{index+1}.png")

    time.sleep(1)

driver.quit()
まとめ
この章では、Seleniumを使用して収集したデータを保存する方法について詳しく学びました。
次の章では、エラーハンドリングとリトライのテクニックについて解説します。スクレイピングを行う際には、予期しないエラーが発生することが多々あります。そのため、エラー処理を適切に行い、スクリプトの信頼性を向上させる方法を学ぶことは非常に重要です。エラーに強いスクレイピングスクリプトを一緒に作成していきましょう!








この記事へのコメントはありません。